Feedback Looper Unit
Looping sample recorder with control of feedback level.Overview
The Feedback Looper is conceptually very similar to a clocked delay line with feedback. It combines the input audio with the audio in its buffer like this:
\[\begin{align} \mbox{NEW} &= \mbox{INPUT} + \mbox{feedback} \times \mbox{OLD} \\ \mbox{OUTPUT} &= \mbox{XFADE}(NEW,INPUT;\mbox{wet}) \end{align}\]where,
- INPUT = the unit input
- OUTPUT = the unit output
- OLD = the previous contents of the buffer
- NEW = the new contents of the buffer
- XFADE(x,y; 0% to 100%) = the crossfade of x and y
Here are some concrete examples,
- 0% feedback means that the input signal completely replaces the old buffer contents.
- 25% feedback means that the input signal at 100% amplitude is mixed with the old buffer contents at 25% amplitude.
- 100% feedback means that the old buffer contents never fade away, but instead are unity mixed with the input signal.
- 0% wet means that you only hear the input of the looper and none of the buffer contents.
- 100% wet means that you only hear the output of the looper and none of its input signal.
Also, notice that the crossfade curves (denoted XFADE in the formula above) used are lifted to compensate for the dip in output volume that results when you use a linear crossfade curve.
Parameters
reset
Move the play/record head to the start position.
A rising edge at this parameter will cause the head to reset to the start position as set by the start parameter. Typically, the start parameter will be zero in which case the head will reset to the beginning of the buffer.
engage
The play/record head advances when engaged.
The head advances forward when engaged and does not advance when it is not engaged. This parameter supports both momentary and latching behaviors. If the Engage Latch setting is ‘on’ then this setting behaves like a toggle such that a rising edge engages the head and the following rising edge disengages it. If the Engage Latch setting is ‘off’ then the head is only engaged while receiving a high value.
punch
Recording when punched in, not recording when punched out.
This parameter is used to punch in or out when recording. It supports both momentary and latching behaviors. If the Punch Latch setting is ‘on’ then this setting behaves like a toggle such that a rising edge punches in and the following rising edge punches out. If the Punch Latch setting is ‘off’ then the unit is punched in only while this parameter is receiving a high value.
start
Sets the reset position.
This parameter determines where in the loop buffer the head will reset. The position is proportional to the total buffer length so that 0 means the beginning of the buffer, 1 means the end, 0.5 means the middle, and so on. Negative values are supported and wrap around to the end of the buffer so that -0.25 is the same as 3/4 of the way into the buffer.
fdbk
Amount of feedback.
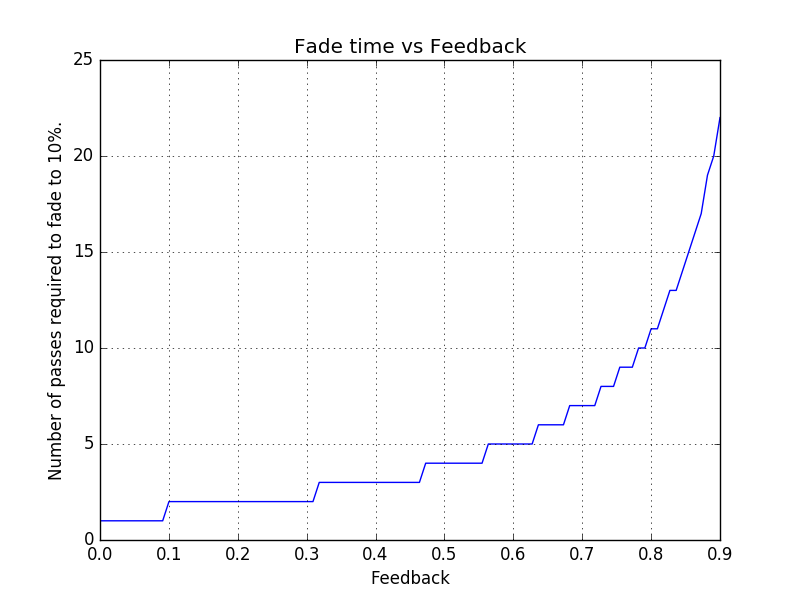
This value determines how much of the original audio to keep when recording (i.e. punched in). A value of 1.0 means that the old and new are summed together as-is and will eventually cause the contents of the buffer to be so loud that it will clip when it arrives at the DAC. A value of 0.0 means that the new material completely replaces the old material. Anything less than 1.0 will cause the old material to slowly fade away with each recording pass.
For example, suppose you set the feedback to 0.5 and then recorded a sine wave with amplitude of 1.0. After recording into the empty buffer, the sine wave will have an amplitude of 1.0 (= 0.5 x 0 + 1.0). Suppose for the 2nd pass you switch the input to silence and continue recording. After the 2nd pass, the amplitude of the sine wave will been attenuated to 0.5 (= 0.5 x 1.0 + 0.0). Continuing on this way, after the 3rd pass the amplitude will be 0.25 (= 0.5 x 0.5 + 0.0), then 0.125 and so on. The following graph summarizes the number of passes required to fade to 10% of the original recorded amplitude vs the feedback amount:
wet
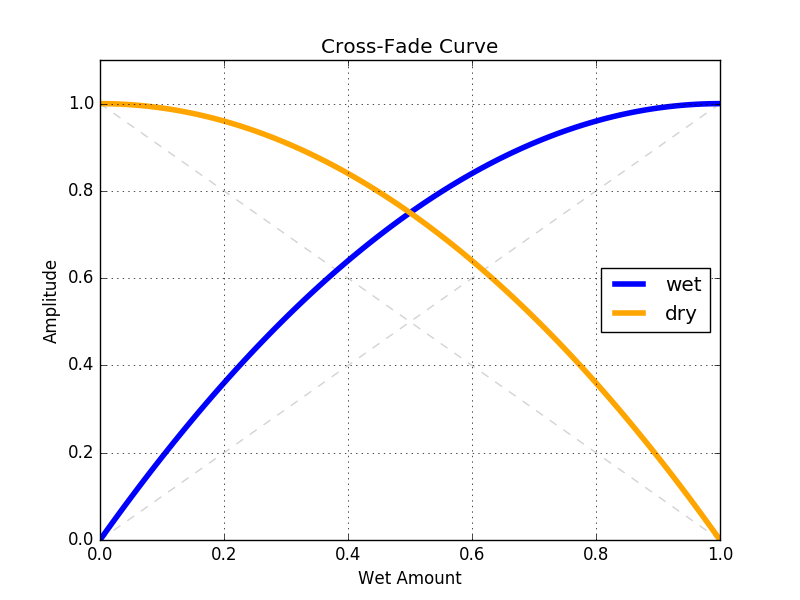
Cross-fades between input signal and buffer playback.
A value of 1 (i.e. 100% wet) means you will only hear the contents of the buffer. A value of 0 (i.e. 100% dry) means you will only hear the signal received at the unit’s input. However, the cross-fade curve is not linear but rather lifted to counteract the tendency for loudness to dip in the center of a linear cross-fade curve. The actual cross-fade curve looks like this:
fade
Fade time when looping or resetting the playback position.
The output might jump discontinuously when the play head loops at the beginning (ending) of the sample, or, when a trigger resets the play head position. When this happens, a fade is used smooth over the discontinuity in the output thus suppressing pops. This parameter sets the length of the fade used.